Monday, 5 December 2011

At Last ...

For the third day which is also the last day, we did the two last sampling. The first sample was taken at 8.00 am and the last one was at 10.00 am. The sample was taken, and we measured the cell growth using spectrophotometer by determining the optical density (OD) reading. We did dilution for samples that have OD reading of more than 0.5.

Duration
Time
OD
DF(OD)
OD×DF
Glu (mmol/L)
DF(Glu)
Glu (mg/dL)
0
2pm
0.137
-
0.137
24.6
4
1771.2
2
4pm
0.454
-
0.454
24.6
4
1771.2
4
6pm
0.381
3
1.143
19.9
4
1432.8
6
8pm
0.352
5
1.760
15.0
5
1375.0
8
10pm
0.262
7
1.834
18.3
2
660.2
18
8am (Fri)
0.198
7
1.386
7.5
2
270.0
20
10am (Fri)
0.468
5
2.340
4.7
1
85

Then we measured the concentration of glucose in the bioreactor by using glucose meter. The glucose utilization is measured as an indication that the cells are growing. As the cells grow, they will utilize the glucose, therefore the concentration of glucose that remained in the bioreactor should be reduced. The OD value increase until 6 hours of fermentation. This indicates that the cells are in log phase, where the cells are growing and utilizing glucose as a carbon source. Starting 6 hours until 8 hours of fermentation, the graph shows that the cells are in stationary phase. During this state, the toxin produced by the cells cause stress to them. Besides, there is no carbon coming into bioreactor. Therefore, oxygen cannot react with carbon to form carbon dioxide. Starting 8 hours to 18 hours of fermentation, the graph declines, showing that the cells are in death phase. The cells die because of no nutrient available.  
  
During that day, Mr Sharman showed us a model of 10L bioreactor. He also explained the functions of the bioreactor and how it operates. Basically, there is no much difference between the 10L bioreactor with the one that we are using. After the explanation, there was a question and answer (Q and A) session regarding bioreactors. During the session, we asked him lots of questions that we have been curiously wanted to know.  
    
As we finished with monitoring the cell growth through manual sampling and data logging, we stopped the fermentation and started the cleaning process! For the cleaning process, firstly, all the wires, power supply and probes are disconnected from the bioreactor. The vessel and the filters that have been removed and cleaned were taken to be autoclaved in the incubator at 70C for sterilization. All the equipments are returned and stored in the box. 


There goes our 3 days LAB-athon, many things we learnt but we personally favour an important advice from Mr. Shaman that is once you identify a problem, solve it immediately. Mr. Shaman likes to mention this whenever there's problems arise from either any of the groups. He told us that if you let the problems unsolved, many will come on later. This doesn't just apply to our lab here but it also applies to our daily lives, whenever there're problems, face it immediately so that non will comes on later.

Continuing Our LABathon

A fresh morning to start our second day of fermentation! Complete the first day task which filled the reagent bottle with sodium hydroxide instead of distilled water. We transfer it in a laminar flow cabinet to maintain the sterile condition. First, we wrapped the table with 70% ethanol. We carried out the procedures near the flame to maintain sterile condition. Distilled water was poured into a beaker, and then we transfer the base which is sodium hydroxide into reagent bottle as shown in the photo below.


After that, we connect all the connections such as pH probes, base pump and air inlet. We took off clamps and aluminium foil which is along the connections. 


Mr. Shaman shared us the about ‘Points & Pitfalls in Fermentation’ and ‘Handling Pumps and Probes’ which are a guideline for us to handle the preparation, calibration and avoid some faults in fermentation.  He taught us how to use the control panel to set up the various parameters such as ̊C, rpm, pH, pO2 and pumps. It is quite difficult to learn the way of setting, look like very complicated. May be is first time for me to access and manipulate the real bioreactor. 


Besides that, Mr. Shaman also taught us how to distinguish the aeration rate and flow rate….as well as how to convert the VVM (Vessel Volumes per Minute) to /min. The VVM is set up based on working volume.  All of us were concentrated on his lectures. 


Before inoculation, Mr. Shaman demonstrated how to set the parameter of the minifors. The parameter depends on the types on inoculums in the fermentor. As mentioned by Mr. Shaman, the settings for parameter of yeast Saccharomyces cerevisiae as follow,
Aeration rate: 1L/min
Speed: 500rpm
Temperature: 30°C
pH: 5
pO2: 100
Antifoam: no foam
Base: Auto

For 100% calibration, we need to turn on all the services available, such as the tap and air compressor. Thus, the bioreactor must be at the operating temperature. Mr. Shaman demonstrated how to set up of Iris. Iris is software which has been installed in our computer in lab. It provides the data, graph and control which is able to link between all parameter in the minifors.

Followed by we was learnt how to pour the inoculum into vessel taught by Mr. Shaman. To avoid contamination all the steps must be carried out carefully. Prior to inoculation into bioreactor, we must shake the shake flask which contain the seed culture. This action is to avoid any cells precipitated in the bottom of shake flask. Then, we need to spray the ethanol on the spare port, mouth of shake flask and carefully pour the inoculums of flask into the vessel. After that, we quickly place the port closure to cover the hole and screw it down. This step was not easily to carried out. For perfectly do this step, we must always practice. It is because we are inexperienced to perform aseptic technique during inoculation. 


After the inoculum has been successfully transferred into the bioreactor, it was already 2pm!! Mr. Shaman showed us how to take the sample aseptically from the bioreactor so that it will reduce the risk of contamination. We take 3ml of the sample and measure the growth of cell by using spectrophotometer to determine the optical density at 600nm.


At 4pm, we took second sample and adjust the sterile speed from 500rpm to 300rpm. At 6pm, we set the cascade of speed, which is 600rpm and 150rpm for the maximum and minimum speed respectively. We take the samples every two hours in order to observe the growth rate of the cells until 10pm of the day and it will continue to observe on the next day.
    

Saturday, 3 December 2011

Introduction and The Beginning.

The Beginning of First Day

Traditionally, fermentation refers to the conversion of sugars or scientifically – carbohydrates into an acid or alcohol. More specifically, fermentation can refer to the use of yeast to change sugar into alcohol or the use of bacteria to create lactic acid in certain foods. Fermentation occurs naturally in many different foods given the right conditions, and humans have intentionally made use of it for many thousands of years. The earliest uses of fermentation were most likely to create alcoholic beverages such as mead, wine, and beer. But due to the rapid advancing technology, fermentation does not limits to conversion of sugar to alcohol anymore.

Fermentation nowadays refers to the process of obtaining a product using a fermentor or modernly known as a Bioreactor. A bioreactor may refer to any manufactured or engineered device or system that supports a biologically active environment. In one case, a bioreactor is a vessel in which will provide a controlled environment for the growth of microorganisms. This process can be either aerobic or anaerobic. 

INFORS HT is specialised for bioreactors, incubation shakers and bioprocess control software. With the aid of a sophisticated systems, in which our cell lines or microorganisms develop their full potential in a reproducible way. The story of INFORS HT began in 1965 with an unoccupied news kiosk in Basel. In the course of time, the family firm advanced to become one of the most important developers and manufacturer of shakers and bioreactors worldwide. Much has changed since the beginning but a lot of important things remain. The uncomplicated culture of the company and the family atmosphere are still retained within INFORS HT. Unorthodox ideas, open thinking, a lot of creativity and even a little irrationality were also the cornerstone of success from the very start.

The company’s history was described in more details by Mr. Shaman – the Regional Manager of South East Asia from IINFORS HT. Besides that, Mr. Shaman also did brief us about the general fermentation process which most of it we have already learnt in lectures during second year. 

Mr. Shaman from INFORS HT


After a quite interesting briefing from Mr. Shaman, without wasting anytime we begin to set up our Bioreactor as well as preparation of our fermentation medium. Mr. Shaman demonstrated on how to set up the Bioreactor on one of our Bioreactor before every group gets to set up by ourselves. 


The empty vessel with its casing. The body of the vessel is made from borosilicate glass and it has a water jacket area surrounding it. The casing is made from stainless steel as to reduce the weight of the equipment. As shown in the picture, the head plate is still not connected to any of the probes from the analyser of the Minifors. 


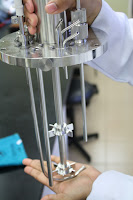
The head plate removed from the vessel. The head plate is attached with the air sparger and agitator with two 4-bladed impeller with it. All of these are made from stainless steel as shown in the picture.


Insertion of the electrolyte into the Oxygen Probe. Mr. Shaman mentioned that we have to be careful on not to contact the membrane of the probe as the membrane is costly and is very sensitive. Another caution matter that one have to take note is to wear a glove while performing this task as the electrolyte is toxic to human.


The media was poured into the working vessel. It is done very slowly as to reduce splash on the wall of the vessel to reduce risk of contamination Approximately 1.55 L of media is used this is because as it goes into the autoclave, the some of the media will evaporate therefore we were advised by Mr. Shaman to add extra media into the working vessel. The media wasn’t boiled before pouring into the vessel because we are going to autoclave the whole vessel in the autoclave machine after wards. Therefore, we can save a step by not boiling the media.


After fitting the head plate onto the body vessel, we’ll have to install or connect all the necessary probes accordingly. It is quite simple as the head plate has all the lables such as temperature ports, pH ports, innoculum port etc. Unlike those olden days where there is no lables, it is quite confusing to install the probes as mentioned by Mr. Shaman. Mr. Shaman also advised us to do it one by one according to clock-wise or in anti-clockwise so that we won’t miss out any probes. However he did mention that the proper way to set up the fermentor is to prepare a to-do-list or SOP. 

While some members are busy installing the probes, the pH has to be calibrated using the pH probes and standard buffer provided from INFORS HT. The calibration is done to the analyser.


After finish installing all the necessary probes, we have to wrap all the filters, big or small with cotton wools and aluminium foil before entering the sterilizing phase. This is because we want to keep the filter under sterile condition even after autoclave. If we left it unwrapped, the filters will be contaminated once again after being remove from the autoclave. 


Not to forget that every tubes that has an open output should be clamped with the mechanical clamps. Actually the tubes were attached with the plastic clamps from the factory but Mr. Shaman advised us not to use that as it is not as effective as mechanical clamps.


We also need to prepare our antifoam and base in the bottle as shown in the picture. These reagent will be autoclaved together with the working vessel as well. Bear in mind that the filters attached to these bottles were to be wrapped with cotton wool and aluminium foil as well.


Everything is DONE! And the look of our fermentor before entering the autoclave machine.


We are good to go. The working vessel together with the head plate is placed into the autoclave machine as shown in the picture. The whole autoclaving process takes about one hour including the cooling time. 


While waiting for our fermentor vessel to be autoclaved, we now proceed to inoculate our Saccharomyces cerevisiae into the inoculation medium. Is has to be done under aseptic condition as show in the photo above. Saccharomyces cerevisiae is a species of yeast and perhaps the most useful yeast of all time. After inoculating it, the shake flask is kept at the incubator at room temperature overnight because we will only inoculate our inoculum on the next day.


After one hour of autoclaving our working vessel, we have to assemble it to the analyser of the fermentor which is shown in the picture above. The assembling is made easy with the help from our Graduate Assistant – Zi Ni. She explained to us step by step and which ports goes to which. We can remove the mechanical clamps now on those tubings that have already connected to the analyser.

What we are going to do next is to insert the diffused oxygen electrode into the vessel from the head plate and allow the probe to calibrate for overnight. It is very important for us to do so because the diffuse oxygen data will tell us a lot of information about the fermentation ongoing as mentioned by Mr. Shaman. Therefore it is very crucial for us to calibrate the diffused oxygen electrode as proper as we can.

That’s the end of Day 1 and we’re preparing for Day 2 !